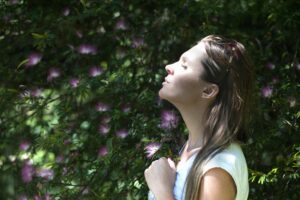
Rejuvenate Your Mind and Body
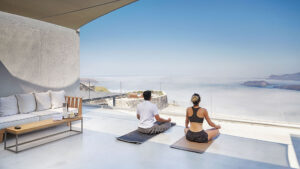
In today’s fast-paced world, finding ways to maintain our well-being has become increasingly essential. Among the various practices available, yoga stands out for its holistic approach to wellness. Derived from ancient Indian traditions, yoga has gained immense popularity worldwide due to its numerous benefits for the mind, body, and spirit.
Yoga is a practice that encompasses physical postures (asanas), breath control (pranayama), and meditation. Its primary objective is to harmonize the body, mind, and spirit. Regular practice of yoga provides a range of benefits, including increased flexibility, strength, and balance, as well as reduced stress, improved mental clarity, and enhanced self-awareness. By incorporating yoga into our daily routines, we can experience a profound positive impact on our overall wellness.
One of the most evident advantages of practicing yoga is its positive impact on physical health. The various yoga asanas (postures) stretch and strengthen the muscles, improve flexibility, and enhance overall body strength. Regular practice can lead to increased stamina, better posture, and improved balance. Additionally, yoga promotes better circulation, boosts the immune system, and helps in maintaining a healthy weight. From increased energy levels to improved cardiovascular health, the physical benefits of yoga are truly remarkable.
Now, lets discuss the various postures / Asanas
Asanas, or yoga postures, are an integral part of the ancient practice of yoga. These physical poses not only promote flexibility and strength but also have a profound impact on our overall health and well-being. Let’s explore the importance of these 10 common asanas for health and delve into how they can positively influence our physical, mental, and emotional well-being.
- Mountain Pose (Tadasana)
Mountain Pose also known as Tadasana in Sanskrit, is a fundamental standing posture in yoga that serves as the foundation for many other poses. This pose helps improve posture and aligns the body. It strengthens the legs, activates the core muscles, and promotes an overall sense of grounding and stability. Practicing Mountain Pose helps improve balance and coordination, making it easier to transition into other poses.
How to practice Adho Mukha Svanasana
Stand Tall: Begin by standing with your feet together, grounding evenly through all four corners of your feet.
Engage Your Muscles: Lift your kneecaps and engage your thighs while keeping your pelvis neutral.
Align Your Body: Ensure your head, shoulders, hips, and ankles are in a straight line. Relax your shoulders away from your ears.
Breathe Deeply: Keep your arms relaxed at your sides or raise them overhead with palms facing each other. Focus on your breath, inhaling and exhaling deeply.
Hold the Pose: Maintain Mountain Pose for 30 seconds to 1 minute, feeling the strength and stability it provides.
Variations
Feet Apart: For better balance, you can practice with your feet hip-width apart, which is especially helpful for those with back pain.
Arm Variations: You can also try variations like raising your arms overhead or placing your hands in a prayer position at your heart
2. Downward Facing Dog (Adho Mukha Svanasana):
Adho Mukha Svanasana, commonly known as Downward-Facing Dog, is a foundational yoga pose that combines elements of stretching, strengthening, and relaxation. This pose resembles a dog stretching its body and is widely practiced in various yoga styles.
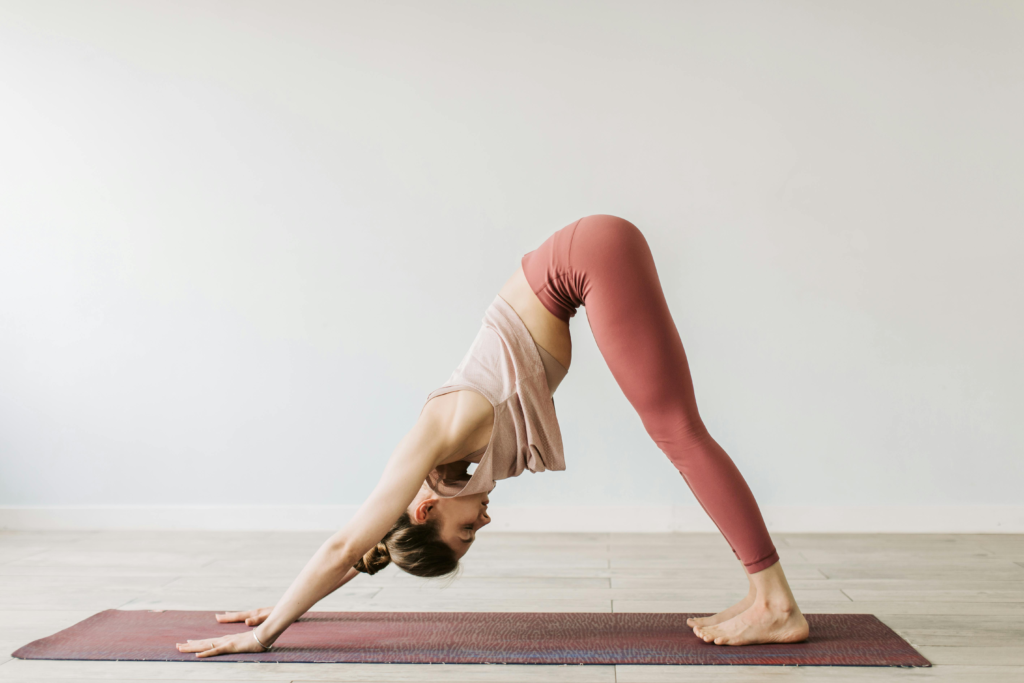
This pose stretches the entire body, particularly the hamstrings, calves, and shoulders. It also increases blood flow to the brain, relieves stress, and improves digestion.
How to practice Adho Mukha Svanasana
Start on All Fours: Begin by kneeling on your hands and knees, ensuring your wrists are aligned under your shoulders and your knees are under your hips.
Tuck Your Toes: Tuck your toes under and, as you exhale, lift your hips up and back, straightening your legs and arms to form an inverted “V” shape with your body.
Position Your Hands and Feet: Your hands should be shoulder-width apart, and your feet should be hip-width apart, with toes pointing straight ahead.
Engage Your Body: Press firmly into the ground with your palms, widening your shoulder blades while keeping your neck relaxed. Let your head hang between your arms.
Adjust Your Posture: Ensure your spine is lengthened, and your heels are reaching toward the mat. If your heels don’t touch the ground, that’s okay—keep your knees slightly bent if needed.
Hold the Pose: Breathe deeply and hold the pose for several breaths, focusing on the stretch along your spine and legs.
Release: To come out of the pose, bend your knees and lower your body back to the starting position on all fours.
Precautions and Contraindications
Avoid this pose if you have wrist, shoulder, or ankle injuries, or if you suffer from high blood pressure or glaucoma.
If you experience discomfort, consider bending your knees or using props like blocks to support your hands.
Variations and Modifications
Bend Your Knees: If your hamstrings are tight, keep your knees slightly bent to maintain a straight spine.
Use a Wall: Perform the pose with your hands on a wall for added support and to help with alignment.
Elevate Your Hands: Place your hands on yoga blocks if you cannot reach the floor comfortably.
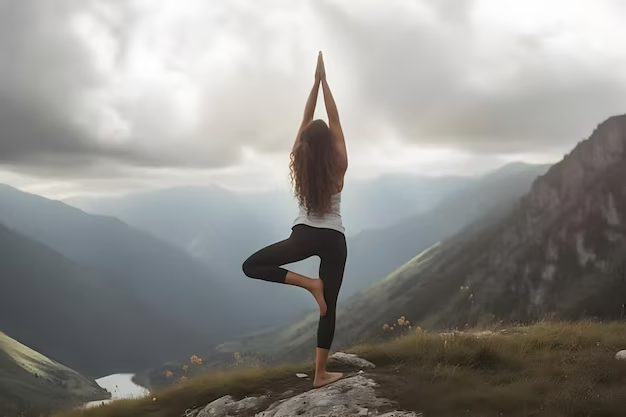
Tree Pose (Vrikshasana)
Vrikshasana, or Tree Pose, is a classic standing balance pose in yoga that symbolizes the strength, grace and steadiness of a tree. This pose helps improve balance, concentration, and focus. By grounding one foot and placing the other foot on the inner thigh, this pose strengthens the legs, while promoting a sense of stability and tranquility.
How to practice Tree Pose (Vrikshasana)
Stand in Tadasana (Mountain Pose) with your feet together and arms at your sides. Engage your core and distribute your weight evenly on both feet.
Shift your weight onto your right foot and bend your left knee, bringing the sole of your left foot to your right inner ankle, calf or thigh. Avoid placing it directly on your knee joint.
Press your left foot firmly into your standing leg and your standing leg firmly into your left foot to engage the muscles.
Bring your hands to your heart center in Anjali Mudra (Salutation Seal) or extend them overhead with palms facing each other. Keep your shoulders relaxed.
Gaze at a fixed point in front of you to help maintain balance. Breathe slowly and deeply.
Hold the pose for 30 seconds to 1 minute, then release and repeat on the other side.**
Variations and Modifications
For added stability, place your lifted foot on your shin or ankle instead of your thigh.
Use a wall or chair for support if needed, especially when first starting out. Lightly touch a wall with your fingertips for balance.
Beginners can keep the toes of the lifted foot on the floor for more stability.
Extend your arms out to the sides for a more challenging variation.
Contraindications and Precautions
Avoid this pose if you have a recent or chronic injury to the standing leg or ankle.
Those with high blood pressure should not raise the arms overhead.
If you have trouble balancing, keep your lifted foot lower, such as on the ankle or calf.
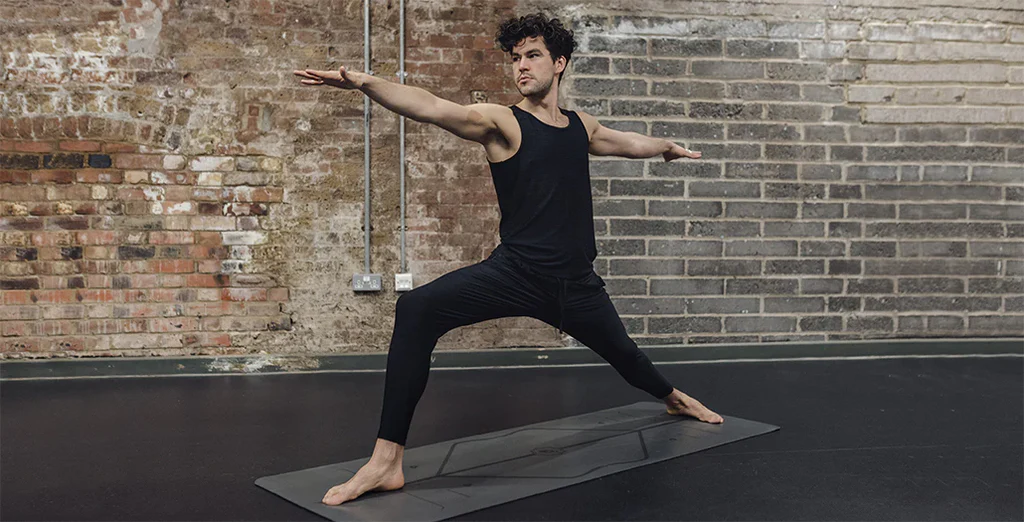
Warrior II (Virabhadrasana II)
Warrior II, or Virabhadrasana II, is a powerful standing yoga pose that embodies strength, stability, and focus. Named after the mythical warrior Virabhadra, this pose is known for its ability to build endurance and enhance concentration while promoting physical and mental balance. It helps counteract the effects of prolonged sitting by opening up the chest and improving spinal alignment. With consistent practice, you’ll find yourself embodying the spirit of a warrior—grounded yet powerful—both on and off the mat.
How to Practice Warrior II
Start in Mountain Pose (Tadasana): Stand tall with your feet together, arms at your sides, and weight evenly distributed.
Step Back: Take a big step back with your left foot, turning it slightly inward (about 45 degrees). Your right foot should point straight ahead.
Position Your Feet: Ensure that your front heel is aligned with the arch of your back foot. Adjust the distance between your feet to find a comfortable stance.
Bend Your Front Knee: Inhale as you raise your arms parallel to the ground at shoulder height. Exhale and bend your right knee, ensuring that it is directly above your right ankle and not extending past it.
Engage Your Body: Press down through the outer edge of your back foot while keeping your shoulders relaxed and aligned over your hips. Your gaze should be directed over your right fingertips.
Hold the Pose: Maintain this position for 5 to 10 breaths, focusing on grounding through your feet and lengthening through your spine.
Release: To exit the pose, straighten your front leg while inhaling and lower your arms back to your sides. Switch sides and repeat.
Precautions and Contraindications
Individuals with knee or ankle injuries should avoid this pose or modify it as needed.
Those with high blood pressure or neck injuries should practice caution; consider keeping the head facing forward instead of turning it to look over the front hand.
If you experience discomfort in the lower back or hips, adjust your stance or consult a qualified instructor for guidance.
Modifications for Beginners
Use a Wall for Support: Stand next to a wall for balance if needed.
Shorten Your Stance: Bring your feet closer together if you have difficulty maintaining balance.
Hands on Hips: Instead of extending your arms, keep them on your hips for added stability while you build strength in the legs.
Variations of Warrior II
Reverse Warrior (Viparita Virabhadrasana): From Warrior II, drop your left hand to your left leg or the floor while raising your right arm overhead to create a gentle side stretch.
Extended Side Angle (Utthita Parsvakonasana): Lean forward from Warrior II, placing your forearm on your front thigh or reaching down to place your hand on the floor beside your foot while extending the opposite arm overhead.
Dynamic Movement: Transition between Warrior II and Straightening the Front Leg (Inhale) then bending it again (Exhale) to build strength in the legs.
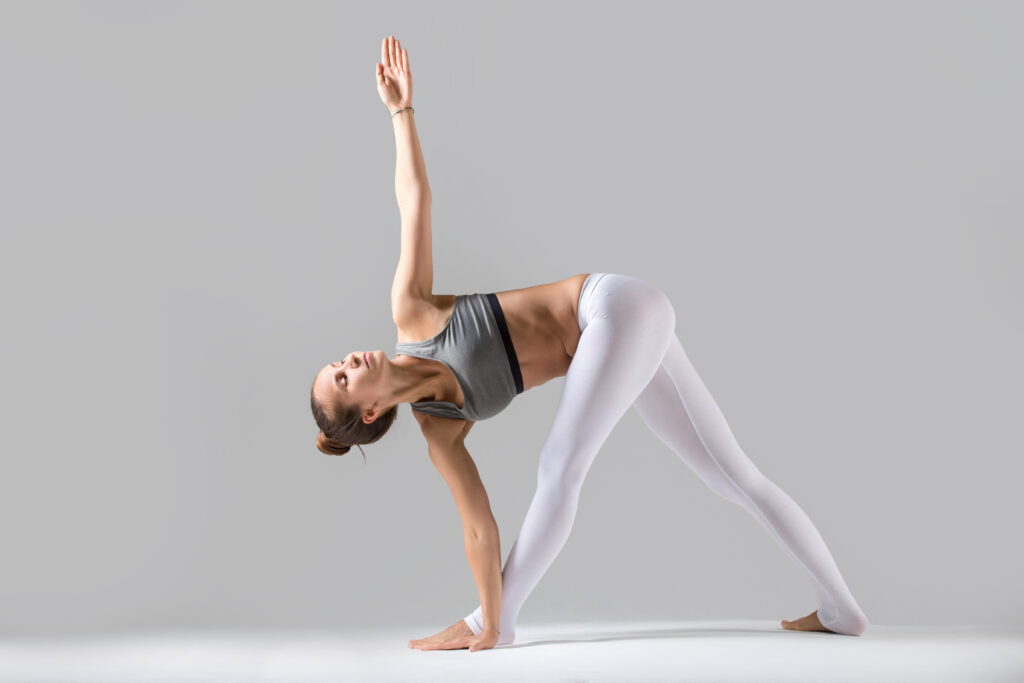
Triangle Pose (Trikonasana)
Trikonasana, or Triangle Pose, is a fundamental standing yoga asana that challenges balance, strength, and flexibility. By forming a triangular shape with the body, this pose engages multiple muscle groups while promoting a sense of stability and focus. By strengthening the muscles along the spine and promoting proper alignment, Trikonasana can help alleviate back pain and discomfort.
How to Practice Trikonasana
Stand with your feet about 3-4 feet apart, parallel to the short edge of your mat. Turn your right foot out 90 degrees and your left foot in slightly.
Engage your legs and roll your right thigh out so your right knee is in line with your right heel.
Inhale and raise your arms parallel to the floor at shoulder height.
Exhale and hinge at the hips, extending your torso to the right, bringing your right hand to your shin, ankle, or the floor. Extend your left arm toward the ceiling, keeping your shoulders stacked.
Gaze up at your left hand or straight ahead. Hold for 5-10 breaths.
Inhale to come up, lowering your arms. Repeat on the other side.
Variations and Modifications
Use a block under your hand for support if needed.
Keep your bottom hand on your shin or a block if reaching the floor is difficult.
Bend your front knee slightly if needed.
For a deeper stretch, turn your head to look up at your top hand.
Precautions and Contraindications
Avoid this pose if you have a recent or chronic injury to the knees, ankles, or hips.
Those with high blood pressure should avoid raising the arm overhead.
If you experience dizziness or vertigo, keep your gaze fixed on the floor in front of you.
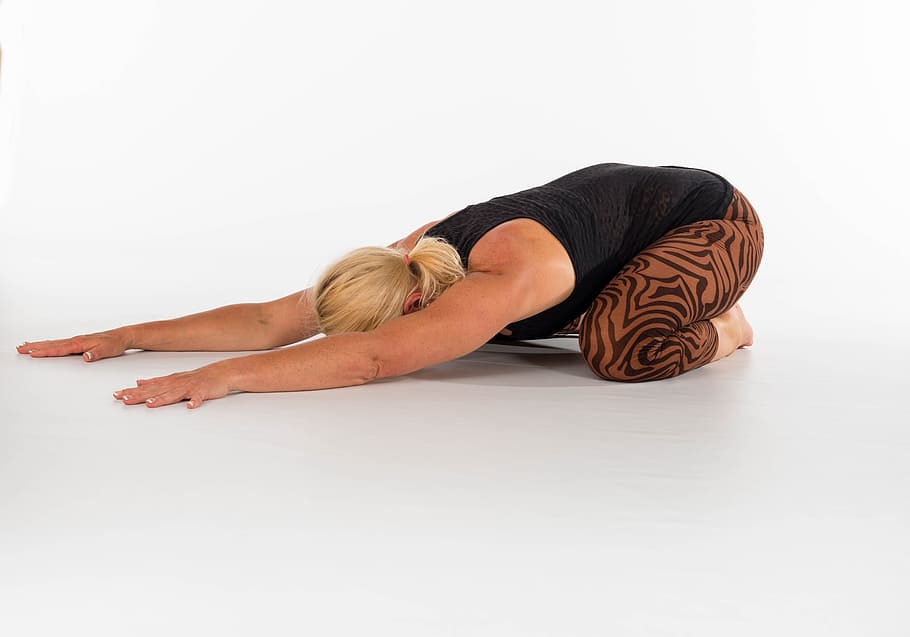
Child’s Pose (Balasana)
Child’s Pose, known as Balasana in Sanskrit, is a restorative yoga posture that promotes relaxation and provides a gentle stretch to various parts of the body. Balasana calms the mind and reduces stress by activating the parasympathetic nervous system, promoting relaxation. The pose gently stretches the hips, thighs, lower back, and shoulders, alleviating tension in these areas. The gentle compression of the abdomen can stimulate digestion and relieve bloating or discomfort. Balasana encourages mindfulness and self-awareness by allowing practitioners to tune into their physical sensations and emotions.
How to Practice Child’s Pose
Start on Your Mat: Begin by kneeling on the floor with your big toes touching and knees spread apart, allowing your torso to rest between your thighs.
Sit Back on Your Heels: Gently lower your hips toward your heels. If this is uncomfortable, you can place a cushion or blanket between your thighs and calves for support.
Extend Your Arms: You can either stretch your arms forward with palms facing down on the mat or rest them alongside your body with palms facing up.
Lower Your Forehead: Allow your forehead to rest on the mat, creating a gentle compression in the forehead area. This helps calm the mind.
Breathe Deeply: Close your eyes and take slow, deep breaths, focusing on relaxing your body and mind. Hold the pose for 30 seconds to several minutes, depending on your comfort level.
To Exit the Pose: Slowly lift your torso back up, coming into a seated position or transitioning into another pose.
Contraindications and Precautions
Avoid Child’s Pose if you have knee injuries or severe ankle issues that make kneeling uncomfortable.
Pregnant individuals should modify the pose by spreading their knees wider to accommodate their belly or use props for support.
If you experience discomfort in your lower back while in this pose, consider using a cushion under your torso for additional support.
Variations of Child’s Pose
Wide-Legged Child’s Pose: Spread your knees wider apart while keeping your big toes touching to create more space for your torso.
Arms Extended Forward: Stretch your arms out in front of you to deepen the stretch in your back and shoulders.
Arms Alongside Body: Rest your arms alongside your body with palms facing up for a more restorative variation.
Supported Child’s Pose: Use a bolster or cushion under your torso for added comfort and support.
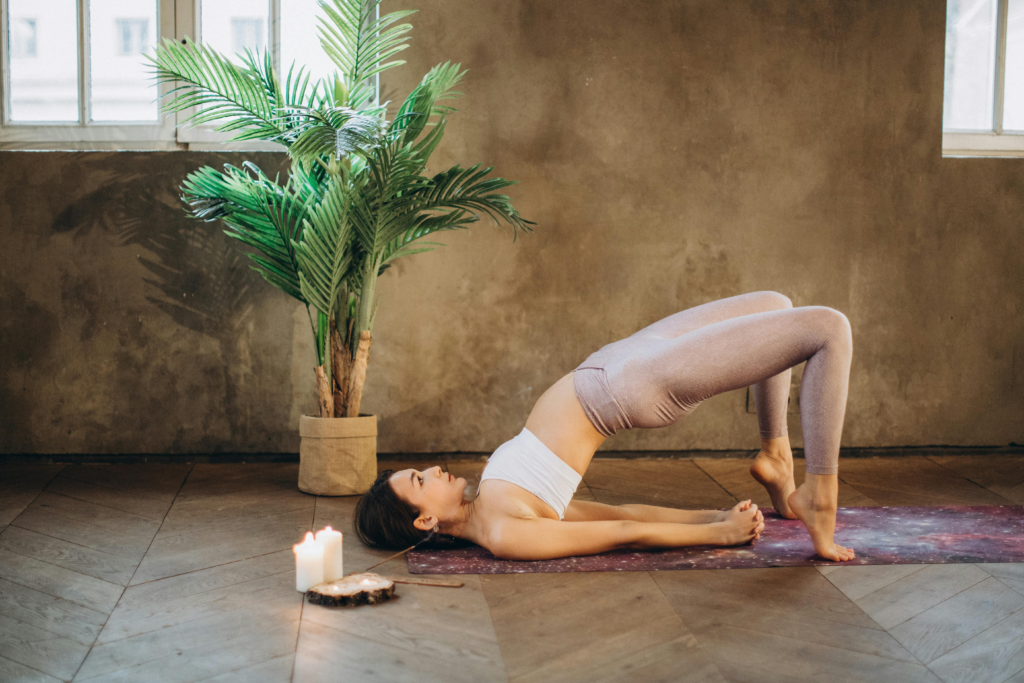
Bridge Pose (Setu Bandhasana)
Setu Bandhasana strengthens the back, glutes, and hamstrings. It also stimulates the thyroid gland, energizes the body, and relieves fatigue. This pose is characterized by lifting the hips while lying on the back, creating a bridge-like shape with the body. It can be practiced dynamically for strength or restoratively for relaxation.
How to Practice Bridge Pose
Start Position: Lie on your back in the center of your yoga mat. Bend your knees and place your feet flat on the floor, hip-width apart and about 12 inches away from your buttocks.
Arm Position: Place your arms alongside your body with palms facing down or interlace your fingers under your back for added support.
Engage Your Core: Press your feet firmly into the mat and engage your core muscles.
Lift Your Hips: Inhale deeply and, as you exhale, lift your hips off the floor by pressing through your feet. Aim to create a straight line from your shoulders to your knees.
Shoulder Position: Roll your shoulders under and draw them away from your ears, opening up your chest. Keep your neck neutral; avoid turning your head during the pose.
Hold the Pose: Maintain this position for 5 to 15 breaths, focusing on lifting through the hips while keeping the thighs parallel and knees aligned with the ankles.
Release: To exit the pose, slowly lower your hips back down to the mat, vertebra by vertebra, and relax in a neutral position.
Benefits of Bridge Pose
Strengthens Muscles: Engages and strengthens the glutes, hamstrings, lower back, and core muscles.
Improves Posture: Helps counteract slouching and kyphosis (abnormal curvature of the spine) by opening up the chest and shoulders.
Relieves Back Pain: Provides relief for those with lower back pain by gently stretching and strengthening back muscles.
Enhances Flexibility: Stretches the spine, chest, neck, and hip flexors, improving overall flexibility.
Stimulates Digestion: The gentle compression of the abdomen can aid in digestion by stimulating abdominal organs.
Reduces Stress and Anxiety: Calms the mind and helps alleviate symptoms of stress, anxiety, and depression by promoting relaxation.
Boosts Circulation: Elevating the heart above the head encourages blood flow and can invigorate energy levels.
Contraindications
Avoid Bridge Pose if you have neck injuries or severe back issues.
Pregnant individuals should consult a healthcare provider before practicing this pose.
Those with knee injuries should practice caution or modify their approach to avoid strain.
Modifications and Variations
Supported Bridge Pose: Place a block under your sacrum for support if you find it challenging to hold Bridge Pose or want a restorative variation.
Half Bridge Pose: Lift only the lower back while keeping the shoulder blades on the floor for a gentler version of the pose.
Bridge Pose with a Block Between Knees: Squeeze a block between your knees to activate inner thigh muscles and maintain alignment.
Dynamic Movement: Practice lifting and lowering in and out of Bridge Pose to build strength gradually before holding it for longer durations.
Single-Leg Bridge: For an advanced variation, lift one leg straight up towards the ceiling while maintaining the bridge position with the other leg.
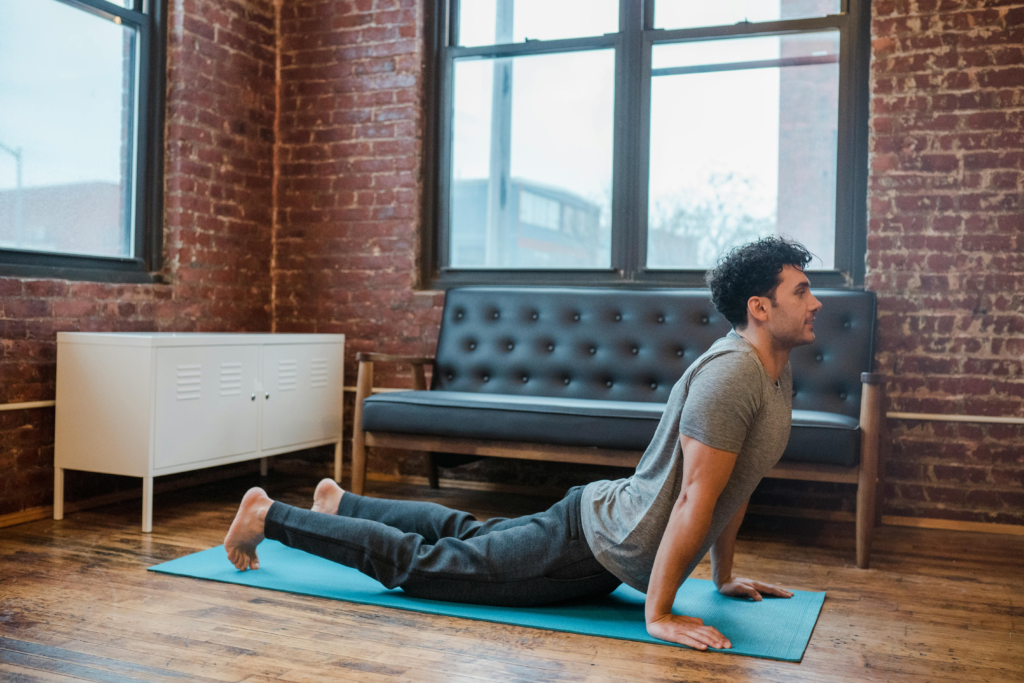
Cobra Pose (Bhujangasana)
Bhujangasana strengthens the spine, opens the chest, and improves posture. It also increases flexibility in the shoulders and abdomen while promoting feelings of empowerment and vitality.
It resembles a cobra with its hood raised, symbolizing strength and flexibility.
How to Practice Cobra Pose
Starting Position: Begin by lying flat on your stomach with your legs extended behind you. Keep your feet hip-width apart, with the tops of your feet pressing into the mat.
Hand Placement: Bend your elbows and place your palms flat on the floor beside your ribs, ensuring that your wrists are aligned under your elbows.
Engage Your Core: Activate your abdominal muscles to support your lower back.
Inhale and Lift: As you inhale, gently lift your chest off the ground by pressing into your hands. Roll your shoulders back and down, keeping them away from your ears.
Low Cobra vs. Full Cobra:
Low Cobra: Keep your elbows bent and close to your body, lifting only your chest while keeping your lower abdomen on the floor.
Full Cobra: Straighten your arms gradually (without locking the elbows) until your belly is off the floor, lifting higher into the pose while maintaining a long neck and engaged core.
Hold the Pose: Maintain the position for 15-30 seconds, breathing deeply and evenly. Focus on lengthening through the spine and opening the chest.
Release: To exit the pose, exhale as you lower your chest back down to the mat.
Benefits of Cobra Pose
Strengthens the Spine: Cobra Pose helps build strength in the spinal muscles, promoting better posture and reducing back pain.
Stretches Key Areas: It provides a deep stretch for the chest, shoulders, and abdominal muscles, counteracting tightness from prolonged sitting or slouching.
Improves Flexibility: Regular practice enhances flexibility in the spine and opens up the hip flexors.
Stimulates Digestive Organs: The gentle compression of the abdomen can stimulate digestion and improve overall digestive health.
Relieves Stress and Fatigue: By opening up the heart center and promoting deep breathing, Cobra Pose can help alleviate stress and fatigue.
Enhances Mood: The pose can help reduce symptoms of depression and anxiety by encouraging an uplifted posture and increased oxygen flow to the brain.
Improves Posture: Practicing this pose regularly can help correct poor posture by strengthening the muscles that support an upright position.
Contraindications
Avoid Cobra Pose if you have recent or chronic injuries to the back, wrists, or shoulders.
Pregnant individuals should consult a healthcare provider before practicing this pose.
Those with carpal tunnel syndrome or severe abdominal conditions should practice caution or avoid this pose altogether.
Modifications and Variations
Sphinx Pose: For a gentler variation, rest on your forearms instead of using your hands to lift into Cobra Pose. This reduces strain on the lower back while still providing a backbend.
Wall Modification: Stand facing a wall with hands pressed against it at shoulder height, bending slightly to open up the chest without lying on the floor.
Dynamic Movement: Practice moving in and out of Cobra Pose with each breath to build strength gradually while maintaining fluidity in movement.
Twisted Cobra: After lifting into Cobra Pose, gently turn your head to one side to stretch the neck further; alternate sides for balance.
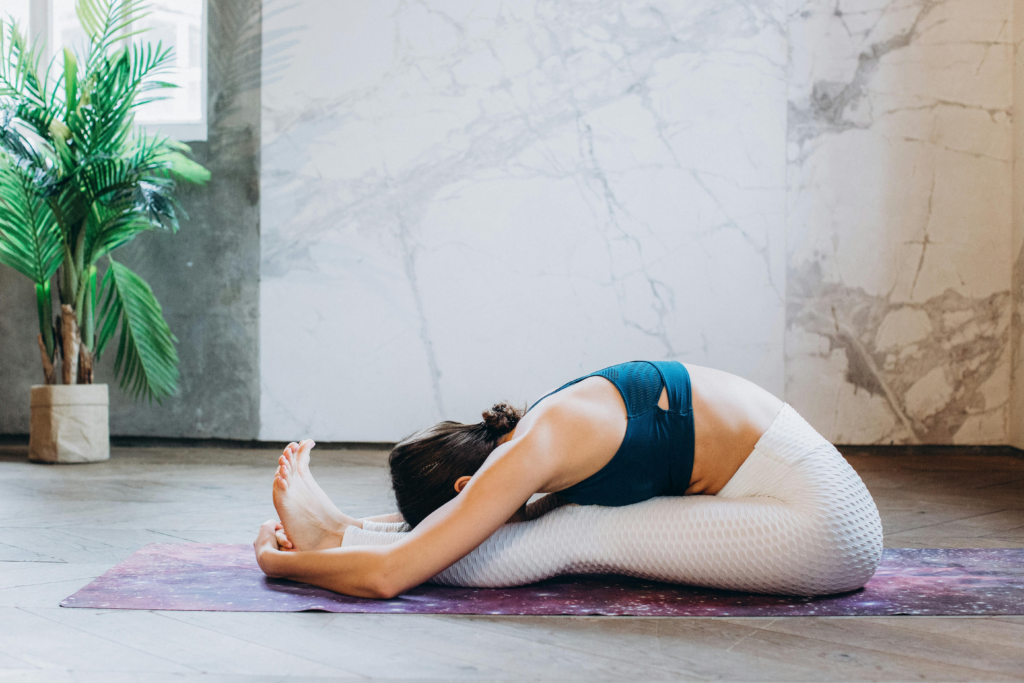
Seated Forward Bend (Paschimottanasana)
Paschimottanasana, commonly known as Seated Forward Bend, is a fundamental yoga pose that promotes flexibility, relaxation, and mental clarity. This pose involves bending forward while seated, providing a deep stretch to the back of the body, particularly the spine and hamstrings.
How to Practice Paschimottanasana
Starting Position: Sit on the floor with your legs extended straight in front of you. Keep your feet together and flex your toes towards you.
Posture Alignment: Sit up tall with a straight spine. Engage your core muscles to support your lower back.
Inhale and Raise Arms: Inhale deeply and raise your arms overhead, stretching them towards the ceiling while lengthening your spine.
Exhale and Fold Forward: As you exhale, hinge at the hips and slowly bend forward, reaching toward your feet. Keep your spine as straight as possible during this movement.
Reach for Your Feet: If you can reach your feet, grasp them with your hands. If not, hold onto your shins or thighs. Avoid forcing the stretch; instead, focus on maintaining a long spine.
Relax Your Head: Allow your head to drop towards your knees or shins, creating a gentle stretch in the neck.
Hold the Pose: Maintain this position for 30 seconds to 1 minute, breathing deeply and allowing your body to relax into the stretch.
Release: To come out of the pose, inhale as you slowly lift your torso back up to a seated position and lower your arms.
Benefits of Paschimottanasana
Enhances Flexibility: Stretches the hamstrings, calves, spine, and shoulders, improving overall flexibility.
Strengthens the Spine: Engages the spinal muscles, promoting strength and stability in the back.
Calms the Mind: The forward bending motion helps reduce stress and anxiety by calming the nervous system.
Stimulates Digestion: Massages abdominal organs, aiding digestion and relieving issues such as constipation.
Relieves Fatigue: Helps alleviate fatigue and insomnia by promoting relaxation and reducing tension in the body.
Improves Posture: Encourages proper alignment of the spine and shoulders, counteracting slouching from prolonged sitting.
Eases Menstrual Discomfort: Can provide relief from menstrual cramps by relaxing abdominal muscles.
Promotes Emotional Well-being: The pose encourages introspection and mindfulness, helping to alleviate feelings of depression or overwhelm.
Contraindications
Avoid this pose if you have:
- Recent or chronic injuries to the back or hamstrings.
- Sciatica or severe lower back pain.
- Pregnancy (consult with a healthcare provider).
Modifications for Beginners
Bend Your Knees: If you find it difficult to reach your feet, keep your knees slightly bent to relieve tension in the hamstrings.
Use Props: Place a strap around your feet or use blocks under your hands for support if you cannot reach your toes comfortably.
Sitting on a Blanket: Sit on a folded blanket or cushion to elevate your hips above your knees for added comfort.
Gentle Variation: Instead of folding all the way forward, simply lean forward slightly while keeping a straight back until you feel a comfortable stretch.
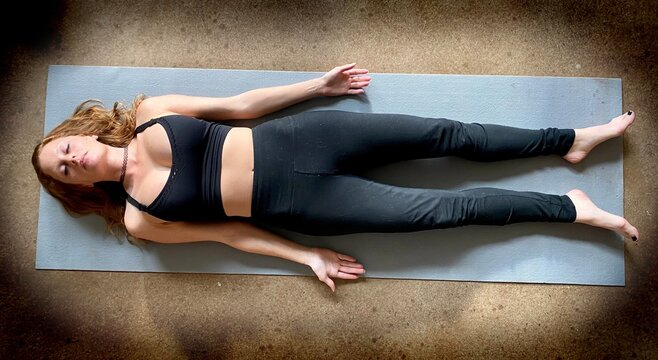
Corpse Pose (Savasana)
Savasana is a fundamental resting pose in yoga that is practiced at the end of most yoga sessions. Despite its apparent simplicity, Savasana is considered one of the most challenging poses due to the mental discipline required to fully relax both the body and mind.
Benefits of Savasana
Reduces stress and anxiety: Savasana activates the parasympathetic nervous system, which is responsible for the body’s rest and digest response, helping to counteract the effects of stress and anxiety.
Lowers blood pressure: Regular practice of Savasana has been shown to help lower blood pressure and heart rate.
Promotes relaxation and rejuvenation: By allowing the body to completely relax, Savasana facilitates the repair of tissues and cells, helping the body recover from the physical and mental demands of the yoga practice.
Enhances mental clarity and focus: The meditative aspect of Savasana helps quiet the mind, improve concentration, and promote a sense of inner peace.
Reduces fatigue and insomnia: Savasana can help alleviate symptoms of fatigue and insomnia by promoting deep relaxation and better sleep.
Improves overall well-being: Regular practice of Savasana can lead to a greater sense of balance, harmony, and overall well-being.
How to Practice Savasana
Lie down on your back with your legs extended and your arms at your sides, palms facing up.
Ensure your body is in a comfortable position, with your head, neck, and spine aligned. You can place a small pillow under your knees or head if needed.
Close your eyes and begin to focus on your breath, allowing it to flow naturally.
Mentally scan your body, consciously relaxing each muscle group from head to toe.
If your mind wanders, gently bring your attention back to your breath or a mantra.
Remain in Savasana for 5-15 minutes, or as long as comfortable.
To exit the pose, slowly begin to deepen your breath, wiggle your fingers and toes, and gently open your eyes.
Variations and Modifications
Use props: Place a pillow under your knees or head for added comfort and support.
Cover your eyes: Use an eye pillow or sleep mask to block out light and further promote relaxation.
Incorporate mudras: Placing your hands in specific mudras (hand gestures) can enhance the meditative aspect of Savasana.
Chant a mantra: Silently repeating a calming mantra can help quiet the mind and deepen the relaxation response.
Precautions and Contraindications
Avoid Savasana if you have severe back pain, neck injuries, or are pregnant (consult with a healthcare provider first).
Practice in a quiet, comfortable environment to minimize distractions and promote relaxation.
Ensure your body is warm by using a blanket if needed.